Pages

Tuesday, April 20, 2010

the Wind was Chill ~ fmnSC005

I love the weather outside...it does look warmer & sunnier than it looks! This Simply Creative Card Kit has no stamping involved at all - so they are fast and easy to put together!

The inside of this card has plenty of room for stamping however. A beautiful branch or some scrolls in chocolate brown would look awesome!

The kit comes with enough product for three cards including envelopes

Posted by Picasa

Thursday, April 15, 2010

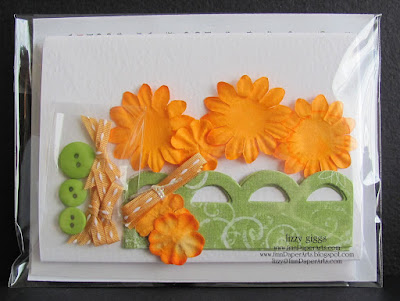
Orange Flower Happy Birthday ~ fmnSC003


Oh to make kits forever! There is something about organizing, cutting, AccuCutting, assembling and most of all...cool packaging that makes my goer go! Sick right?? I don't know what I would do if my husband didn't get the "packaging" thing. Although he was looking askance at the tiny clearbag within the packaging and rolled his eyes at my need to make it "just so"! Can you see it?? The little wee bag has the bows and buttons in it. Makes sense right? If they weren't in there...they might get lost!!


This is such an easy easy little card. And it is little! It is baronial size (A4). That means "Thank You" card size like you might receive after sending someone a shower gift. The kit has enough for 3 cards minus the stamps! I did put some good white cardstock in there to stamp on ...and of course there are envelopes...vellum actually!


Thanks to my friend Demra who has the same sick packaging disease as me and will do it for coffee and a cookie!!

Materials used:

Paper:
Prism White (now owned by Bazzill!) 12 x 12 Flutter Butter Willow by Bo-Bunny, 12 x 12 green at heart - grasshopper by Basic Grey
Embellishments:
Buttons ~ SEI Alpine Frost. Flowers ~ KaiserCraft F606 Pumpkin. Ribbon ~ Lasting Impressions RITABS Tangerine Stitched (you can also get this from May Arts)
Posted by Picasa

Wednesday, April 14, 2010

Spring Comes ~ fmnSC004


I was making cards for a class at "Remember When Scrapbooking" when I realized it would make a great card kit. I switched out the ribbon and used a different stamp, but didn't change the basic design much. The frame is raised up on a matching piece of chipboard and adds some dimension to the front of the card. I love this particular scallop die from AccuCut and promptly added another layer of scallops to match. Sometimes when I can't find a sentiment I prefer, or in this case, didn't want to add too much work to the class, I go looking online to find quotes that appeal to me and relate to what's going on outside. The great thing about printing something out yourself is making all the colors go together


Any butterfly or flower or bow, would be a easy addition to this card. But if you need a neat little set of stamps to get you going, you can use the same on I did and find it HERE.

If you would like to purchase this kit, you can purchase it HERE. There is enough product to make the card three times.
Posted by Picasa

Monday, April 5, 2010

Little White Church

I love using a brayer to color my glossy paper. It's a little tricky. You'd think it would be better to start with the lightest color, but at a recent class, we discovered that starting at the bottom of the card with the darkest color will give us an opportunity later to re-activate the green in this case and blend it into the light blue gradually.


You can make this card at Destination Marysville on April 10th along with two other cards, lunch and access to several dozen Stampscapes Rubber Stamps so that you can take what you've learned and play for another 2 1/2 hours. Check out the Stampscapes website as well...it has the most amazing gallery and tutorials you'll find anywhere.
Posted by Picasa
Related Posts Plugin for WordPress, Blogger...